Kubernetes Multi-Master Setup with LoadBalancer on Ubuntu

👋 Welcome to my Hashnode profile! I'm a passionate technologist with expertise in AWS, DevOps, Kubernetes, Terraform, Datree, and various cloud technologies. Here's a glimpse into what I bring to the table: 🌟 Cloud Aficionado: I thrive in the world of cloud technologies, particularly AWS. From architecting scalable infrastructure to optimizing cost efficiency, I love diving deep into the AWS ecosystem and crafting robust solutions. 🚀 DevOps Champion: As a DevOps enthusiast, I embrace the culture of collaboration and continuous improvement. I specialize in streamlining development workflows, implementing CI/CD pipelines, and automating infrastructure deployment using modern tools like Kubernetes. ⛵ Kubernetes Navigator: Navigating the seas of containerization is my forte. With a solid grasp on Kubernetes, I orchestrate containerized applications, manage deployments, and ensure seamless scalability while maximizing resource utilization. 🏗️ Terraform Magician: Building infrastructure as code is where I excel. With Terraform, I conjure up infrastructure blueprints, define infrastructure-as-code, and provision resources across multiple cloud platforms, ensuring consistent and reproducible deployments. 🌳 Datree Guardian: In my quest for secure and compliant code, I leverage Datree to enforce best practices and prevent misconfigurations. I'm passionate about maintaining code quality, security, and reliability in every project I undertake. 🌐 Cloud Explorer: The ever-evolving cloud landscape fascinates me, and I'm constantly exploring new technologies and trends. From serverless architectures to big data analytics, I'm eager to stay ahead of the curve and help you harness the full potential of the cloud. Whether you need assistance in designing scalable architectures, optimizing your infrastructure, or enhancing your DevOps practices, I'm here to collaborate and share my knowledge. Let's embark on a journey together, where we leverage cutting-edge technologies to build robust and efficient solutions in the cloud! 🚀💻
This blog post will help you with Kubernetes Multi-Master Setup with LoadBalancer on Ubuntu, This will provide you with a complete step-by-step procedure to set up a Kubernetes cluster with multi-master nodes on Ubuntu using Kubeadm.
Multi-cluster setup: Intro
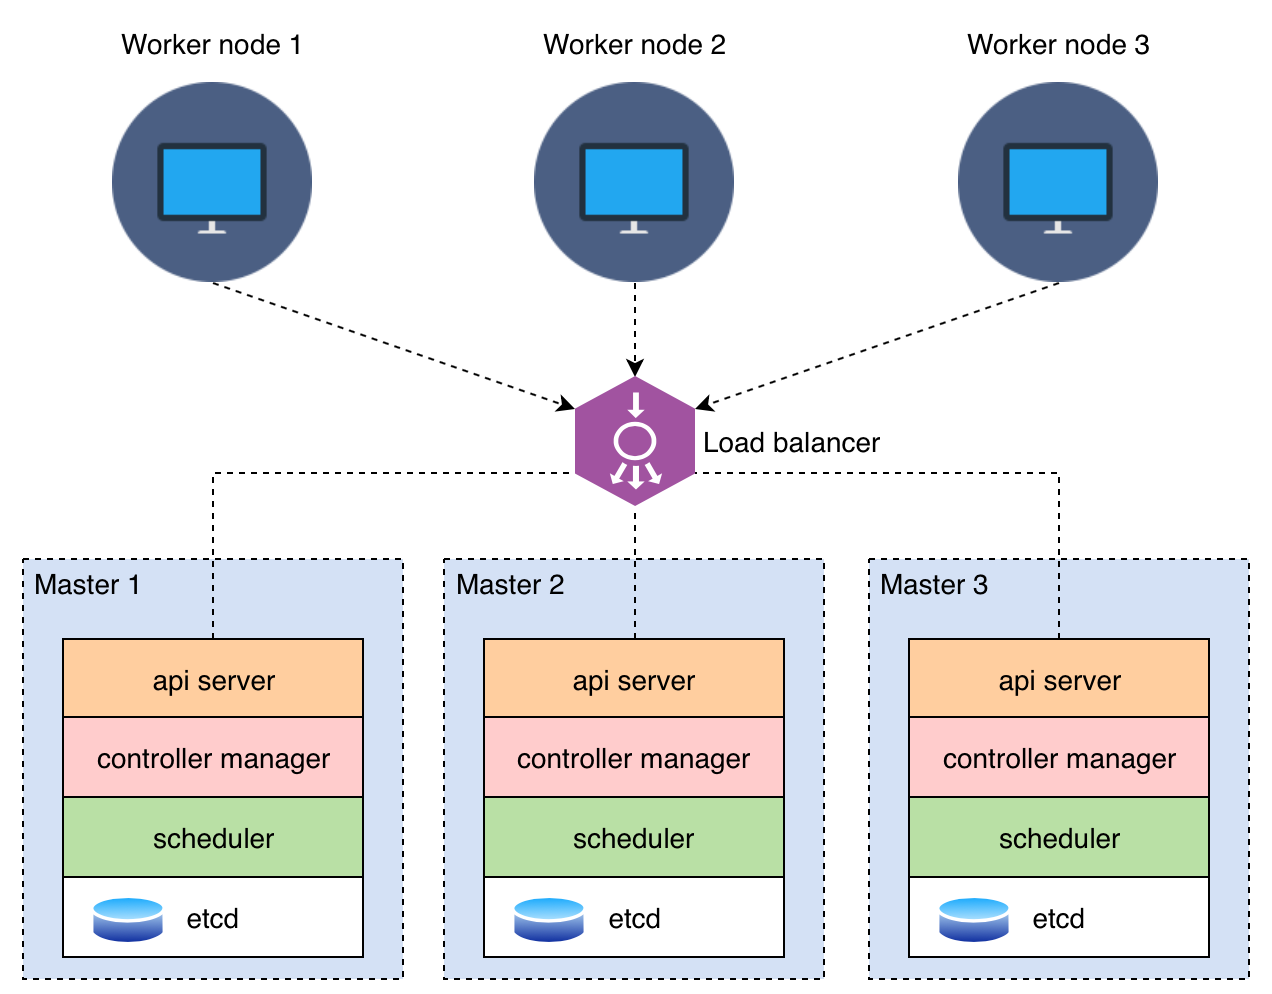
A multi-master setup is a configuration used in distributed systems, databases, and other applications to provide high availability, fault tolerance, and load balancing. When you combine a multi-master setup with HAProxy, you create a robust and scalable infrastructure. Here's why you might need a multi-master setup and how it can be used with HAProxy:
1. High Availability: One of the primary reasons for using a multi-master setup is to ensure the high availability of your services or data. In a multi-master configuration, multiple nodes can accept read and write operations. If one node fails, the system can continue to function because other nodes are available to take over.
2. Load Balancing: Multi-master setups distribute incoming traffic across multiple nodes, which helps balance the load. This ensures that no single node is overwhelmed with requests, and it improves the overall performance and responsiveness of your application.
3. Scalability: As your application grows, you can add more nodes to your multi-master setup, allowing you to scale horizontally. This means you can handle increased traffic and data without a significant drop in performance.
4. Fault Tolerance: In a multi-master setup, if one node fails, other nodes can take over the workload. This redundancy helps ensure that your application remains available even in the face of hardware failures or other issues.
5. Data Synchronization: Multi-master setups typically include mechanisms for data synchronization between nodes. This ensures that data consistency is maintained across all nodes, even in the presence of concurrent read and write operations.
Using HAProxy with Multi-Master Setup:
HAProxy is a high-performance load balancer and reverse proxy server. When combined with a multi-master setup, HAProxy provides additional benefits:
1. Load Balancing: HAProxy can distribute incoming traffic evenly across all the nodes in your multi-master setup. This ensures that no single node is overwhelmed, and it maximizes the utilization of resources.
2. Health Checks: HAProxy can perform health checks on your nodes and route traffic only to healthy nodes. If a node becomes unhealthy, HAProxy can automatically redirect traffic to healthy nodes.
3. Failover: In the event of a node failure, HAProxy can detect the failure and route traffic to the remaining healthy nodes. This ensures uninterrupted service even during node failures.
4. SSL Termination: HAProxy can handle SSL termination, offloading the SSL/TLS encryption and decryption from your backend servers, which can improve performance.
5. Rate Limiting: HAProxy can enforce rate limiting and access control policies, protecting your backend nodes from abuse or excessive traffic.
In summary, a multi-master setup with HAProxy offers high availability, load balancing, scalability, and fault tolerance for your applications and services. It's a powerful combination to ensure your systems are robust and can handle increased traffic and data while maintaining high availability.
Prerequisites:
A minimum of 2 CPUs with 4Gb Memory is required.
Note: All nodes are installed with Ubuntu 20.04. You can add multiple worker nodes as you want and follow the steps given. Only due to my limitations and pricing, I used a minimum worker node. The agenda of this blog is to have a multi-master node setup, since no need to worry about worker nodes.
Users must have root or sudo access to perform administrative tasks. (switchover to root user to avoid unnecessary permission issues).
Steps:
Here I launched Two master nodes, one worker node and one for haproxy.
(OPTIONAL)- Make an entry of each host in the /etc/hosts file for name resolution on all nodes as below or configure it on DNS if you have a DNS Server.
 $ cat /etc/hosts
 10.0.1.77  haproxy-lb
 10.0.1.54  kubernetes-master1
 10.0.1.252  kubernetes-master2
 10.0.1.32  kubernetes-worker1
Make sure all the nodes are reachable between each other.
Internet must be enabled on all nodes because we will be using official repositories to download and install the required packages to set up the Kubernetes cluster.
Let's Get Started.
On HAProxy Server (IP: 10.0.1.77):
1. Install HAProxy
Use apt-get command to install HAProxy package as below.
# apt update && apt install -y haproxy
2. Configure HAProxy
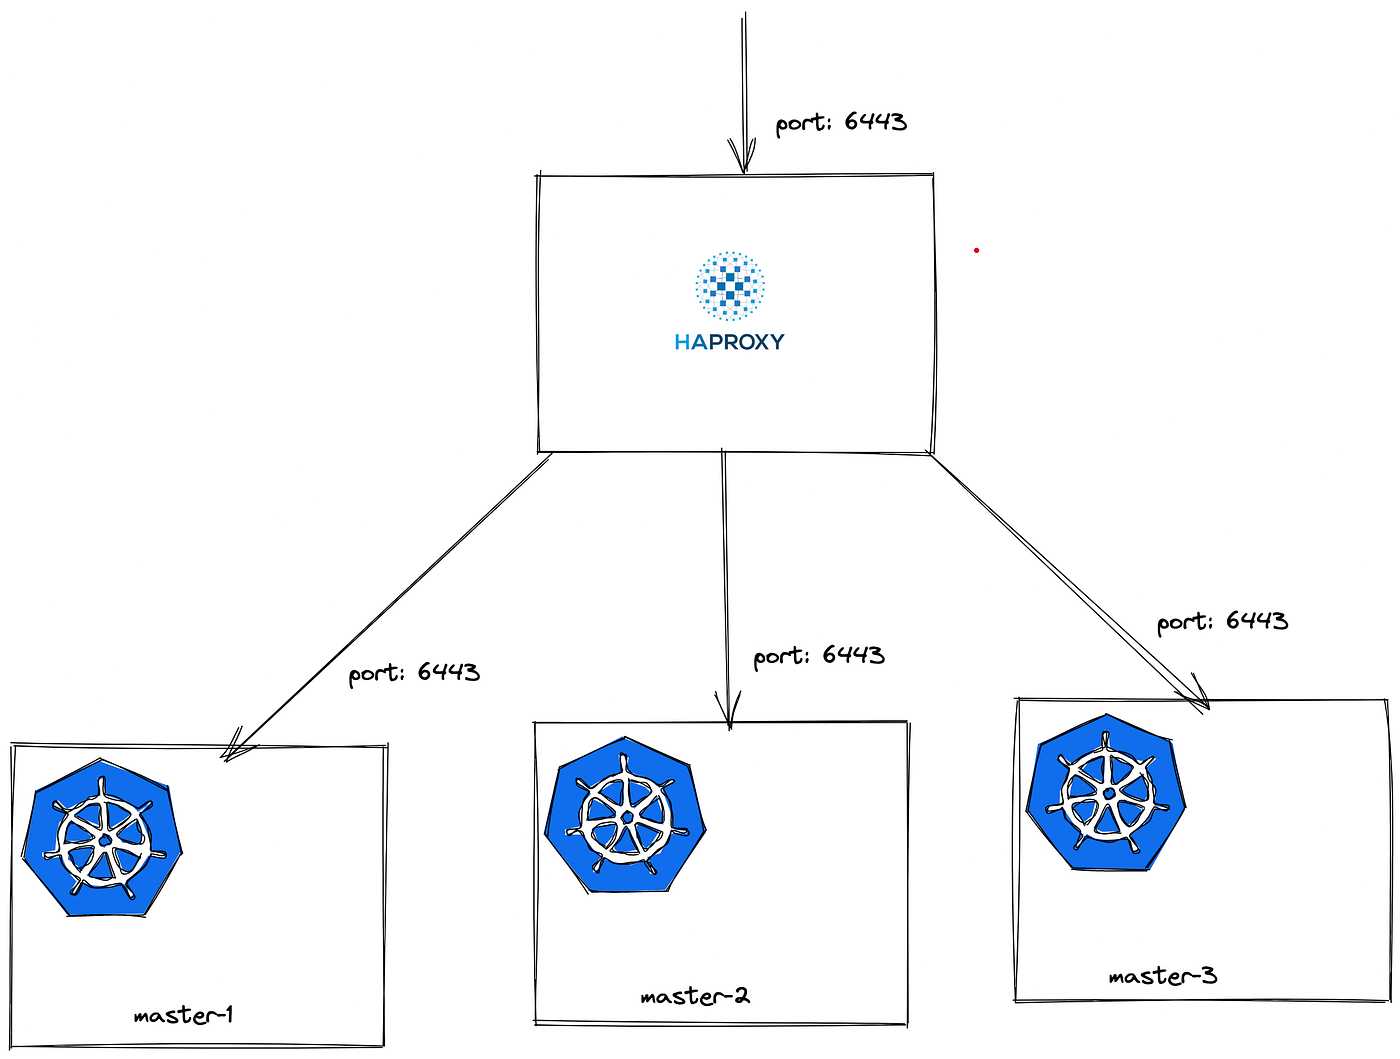
Once HAproxy is installed, configure HAProxy to forward the traffic across the Kubernetes master nodes.
Edit the config file /etc/haproxy/haproxy.cfg to define the frontend and backend configuration and append the below config. Replace the IP Address with your HaProxy and Kubernetes Master Nodes.
    frontend kubernetes
        bind 10.0.1.77:6443
        option tcplog
        mode tcp
        default_backend kubernetes-master-nodes
    backend kubernetes-master-nodes
        mode tcp
        balance roundrobin
        option tcp-check
        server kubernetes-master1 10.0.1.54:6443 check fall 3 rise 2
        server kubernetes-master2 10.0.1.242:6443 check fall 3 rise 2
3. Start and Enable HAProxy.
Use systemctl command to start and enable the HAProxy service as below.
    # systemctl restart haproxy
    # systemctl enable haproxy
On all Kubernetes nodes:
4. Prerequisites Kubernetes Configurations
Kubernetes doesn't support "Swap". Disable swap on all Kubernetes nodes and also to make it permanent, comment out the swap entry in /etc/fstab file as below.
# swapoff -a; sed -i '/swap/d' /etc/fstab
Allow sysctl to pass bridged traffic of IPv4 and IPv6 to iptables chains for Kubernetes networking.
    cat >>/etc/sysctl.d/kubernetes.conf<<EOF
    net.bridge.bridge-nf-call-ip6tables = 1
    net.bridge.bridge-nf-call-iptables = 1
    EOF
5. Enable Docker and Kubernetes Repository
Before beginning, we must update the Ubuntu repositories and install basic tools like apt-transport-https, curl and etc,.
# apt-get update && apt install -y apt-transport-https ca-certificates curl gnupg-agent software-properties-common
Once installation is completed, enable and install docker on all nodes.
    # curl -fsSL https://download.docker.com/linux/ubuntu/gpg | apt-key add -
    # add-apt-repository "deb [arch=amd64] https://download.docker.com/linux/ubuntu $(lsb_release -cs) stable"
    # apt update && apt install -y docker-ce containerd.io
After the docker installation, add the Kubernetes signing key and add the Kubernetes repository on all nodes.
    # curl -s https://packages.cloud.google.com/apt/doc/apt-key.gpg | apt-key add -
    # echo "deb https://apt.kubernetes.io/ kubernetes-xenial main" > /etc/apt/sources.list.d/kubernetes.list
6. Install Kubernetes packages.
Use apt-get command to install kubeadm, kubelet and kubectl packages with specific versions. Very newer version 1.21.x, 1.22.x does not work on Ubuntu 20.04.
# apt update && apt install -y kubeadm=1.20.0-00 kubelet=1.20.0-00 kubectl=1.20.0-00
Make sure kubelet service is running or not.
# systemctl status kubelet
On Kubernetes Master Nodes - Anyone Node (10.0.1.54):
7. Initializing and Setting up Kubernetes master node.
Only on the first kubernetes master node, Use "kubeadm" command to initialize the kubernetes cluster along with "--control-plane-endpoint", "apiserver-advertise-address" and "--pod-network-cidr" options. It is used to specify the control plane server IP Address, the IP address for Kubernetes cluster communication, and the range of networks for the pods respectively.
# kubeadm init --control-plane-endpoint="10.0.1.77:6443" --upload-certs --apiserver-advertise-address=10.0.1.54 --pod-network-cidr=192.168.0.0/16
Output Trimmed:
    Your Kubernetes control-plane has initialized successfully!
    To start using your cluster, you need to run the following as a regular user:
    mkdir -p $HOME/.kube
    sudo cp -i /etc/kubernetes/admin.conf $HOME/.kube/config
    sudo chown $(id -u):$(id -g) $HOME/.kube/config
    Alternatively, if you are the root user, you can run:
    export KUBECONFIG=/etc/kubernetes/admin.conf
    You should now deploy a pod network to the cluster.
    Run "kubectl apply -f [podnetwork].yaml" with one of the options listed at:
    https://kubernetes.io/docs/concepts/cluster-administration/addons/
    You can now join any number of the control-plane node running the following command on each as root:
    kubeadm join 10.0.1.77:6443 --token pdrhap.w5ynabi9aa24l9cc
    --discovery-token-ca-cert-hash sha256:ccdede9a044092b93b720f05b4172da8b10070f0fa4a56445b0a27bdc0d5eaba
    --control-plane --certificate-key 4520073a1f14e58d48a1fb3515b6bac3be41cac89ed51561067783b1a24684ac
    Please note that the certificate-key gives access to cluster sensitive data, keep it secret!
    As a safeguard, uploaded-certs will be deleted in two hours; If necessary, you can use
    "kubeadm init phase upload-certs --upload-certs" to reload certs afterward.
    Then you can join any number of worker nodes by running the following on each as root:
    kubeadm join 10.0.1.77:6443 --token pdrhap.w5ynabi9aa24l9cc
    --discovery-token-ca-cert-hash sha256:ccdede9a044092b93b720f05b4172da8b10070f0fa4a56445b0a27bdc0d5eaba
Once Kubernetes cluster initialization is completed, Copy the join token for control plane to join any number of the control-plane node.
Copy the other join token to any number of worker nodes.
Store it in a secure location, it may be required for you later.
8. Post Kubernetes Cluster Setup
To start using your cluster, you need to run the following as if you have logged in as a regular user:
    #  mkdir -p $HOME/.kube
    #  sudo cp -i /etc/kubernetes/admin.conf $HOME/.kube/config
    #  sudo chown $(id -u):$(id -g) $HOME/.kube/config
Alternatively, if you are the root user, you can run the below, even though I have logged in as the root user:
# export KUBECONFIG=/etc/kubernetes/admin.conf
9. Install Network add-on to enable the communication between the pods.
We have a lot of network add-ons available to enable network communication with different functionality, Here I have used Calico network provider.
# kubectl create -f https://docs.projectcalico.org/v3.15/manifests/calico.yaml
10. Join all Other Kubernetes Master nodes:
Login into other Kubernetes master nodes and use the join token of the control plane
    # kubeadm join 10.0.1.77:6443 --token pdrhap.w5ynabi9aa24l9cc
    --discovery-token-ca-cert-hash sha256:ccdede9a044092b93b720f05b4172da8b10070f0fa4a56445b0a27bdc0d5eaba
    --control-plane --certificate-key 4520073a1f14e58d48a1fb3515b6bac3be41cac89ed51561067783b1a24684ac
Replace with your join token of master nodes.
11. Join all Kubernetes Worker Nodes:
Login into other Kubernetes worker nodes and use the join token of worker nodes.
    # kubeadm join 10.0.1.77:6443 --token pdrhap.w5ynabi9aa24l9cc
        --discovery-token-ca-cert-hash sha256:ccdede9a044092b93b720f05b4172da8b10070f0fa4a56445b0a27bdc0d5eaba
Replace with your join token of worker nodes.
Once all is done, verify the list of nodes been added to the Kubernetes cluster using the below command.
# kubectl get nodes.
That's all, we are done with Kubernetes Multi-Master Setup with Loa dBalancer on Ubuntu.


