Introduction
In today's multi-cloud and hybrid cloud environments, managing user access across multiple platforms can be a daunting task. AWS Identity and Access Management (IAM) Identity Center, formerly known as AWS Single Sign-On (SSO), provides a streamlined way to manage access to AWS accounts and applications. This guide will walk you through the process of setting up IAM Identity Center, highlighting its benefits and step-by-step instructions for a seamless setup.
Why IAM Identity Center
IAM Identity Center simplifies access management across AWS accounts and integrated applications. It allows you to manage user identities, provide single sign-on (SSO) access, and enforce security policies efficiently. With IAM Identity Center, you can centralize the administration of user permissions, reducing the complexity and administrative overhead associated with managing individual IAM roles and policies.
Benefits of SSO
Centralized Access Management: Manage access to multiple AWS accounts and applications from a single place.
Improved Security: Enforce consistent security policies and multi-factor authentication (MFA) across all platforms.
Enhanced User Experience: Users can access all their assigned AWS resources and applications with a single set of credentials.
Reduced Administrative Overhead: Simplify the onboarding and offboarding process for users by managing permissions centrally.
Steps in Setting Up IAM Identity Center
Prerequisites
Before setting up IAM Identity Center, ensure you have the following prerequisites in place:
Login using Root Account or Admin Permissions: Ensure you are logged in with the root account or a user having administrative permissions.
AWS Organization: IAM Identity Center requires AWS Organizations. If you haven't already set up an organization, you need to create one.
User Directory: A user directory in AWS Managed Microsoft AD or another identity source.
Enable IAM Identity Center
Log in to the AWS Management Console: Navigate to the IAM Identity Center service.
Create an Organization: If you haven't already done so, go to the AWS Organizations console and create an organization. This will allow you to manage multiple AWS accounts centrally.
Enable IAM Identity Center: If not already enabled, click on the "Enable IAM Identity Center" button.
If you enable Identity Center, it will create Organization (If you don't have Organization setup before)
Select Identity Source: Choose your identity source. Options include AWS Managed Microsoft AD, Active Directory, or an external identity provider via SAML 2.0. For this guide, we'll focus on Identity Center directory.


Adding or Inviting Other Accounts to the Organization
Navigate to AWS Organizations Console: In the AWS Management Console, go to the AWS Organizations service.
Add Account: Click on "Add account" and choose to either create a new account or invite an existing account.
Create New Account: Fill in the required details such as email address, account name, and IAM role.
Invite Existing Account: Enter the email address of the account owner and send the invitation. The account owner needs to accept the invitation to join the organization.
Confirm Accounts in Organization: Once added or invited, ensure all the necessary accounts are listed in your AWS Organization.
Adding Users and Permission Sets
Navigate to Users: In the IAM Identity Center console, go to the "Users" section.
Inside IAM Identity Center, Create a group (e.g., “admin”) and create a user (e.g., “Navya”) and add them to the group (e.g., “admin”). If the group does not exist, create it.


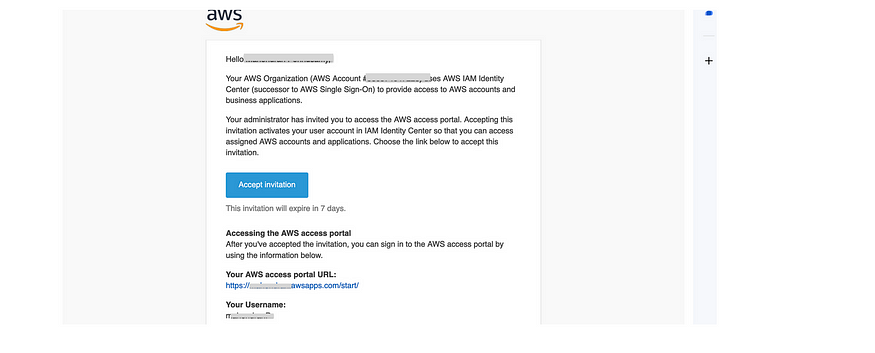
Accept the Invitations: After adding users, you will receive an email with the subject “Invitation to join AWS Single Sign-On.” Open the email and choose “Accept invitation” to complete the user setup process.

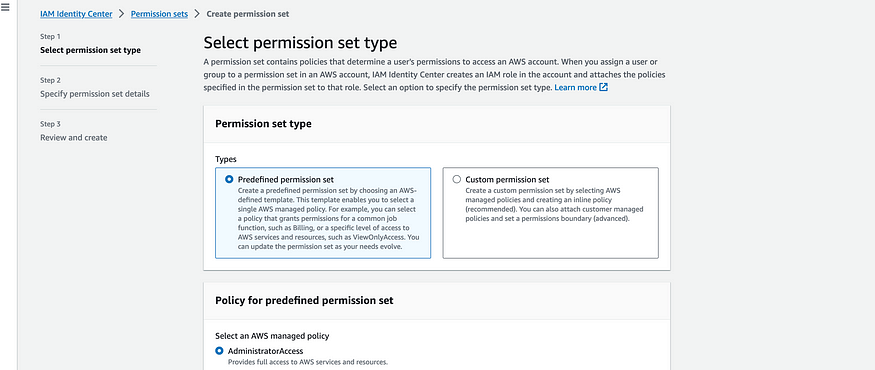
Create Permission Sets: Go to the "Permission sets" section and click "Create permission set". Select a predefined policy or create a custom policy that defines the permissions for your users.


Assign Permission Sets to Users: After creating the permission sets, assign them to your users by selecting the user and attaching the appropriate permission set.
Assign Users or Groups
Navigate to Assignments: In the IAM Identity Center console, go to the "Assignments" section.
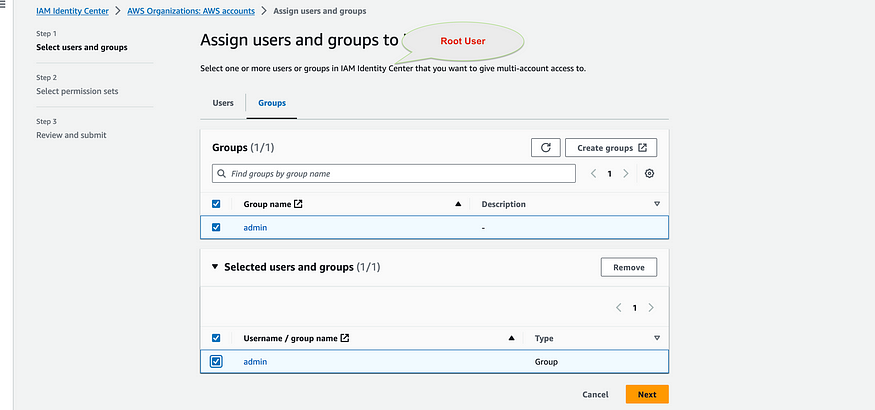
Assign Users/Groups to AWS Accounts: Click on "Assign users/groups" and select the users or groups you want to assign. Choose the AWS accounts and the permission sets for these users or groups.
Review and Confirm: Review the assignments and confirm the changes.

How to Access the Accounts via SSO
Login Portal: Direct your users to the IAM Identity Center user portal URL, which can be found in the IAM Identity Center console.
Sign In: Users can sign in using their credentials from the selected identity source.
Access AWS Accounts and Applications: Once signed in, users will see a dashboard with all their assigned AWS accounts and applications. They can click on any of these to access the respective resources without needing to re-enter their credentials.
Conclusion
Setting up IAM Identity Center in AWS provides a robust and streamlined solution for managing user access across multiple AWS accounts and applications. By following the steps outlined in this guide, you can ensure a secure, efficient, and user-friendly access management system for your organization. Enjoy the benefits of centralized access control, enhanced security, and simplified user management with IAM Identity Center.
